Materials
These tweeter repairs all have one thing in common. To sound their best all of them require a very special spacer to be made which spaces the tweeter behind the face plate about 5mm. I covered the build of this spacer here and won't bother to repeat it. I did get away without a spacer with the Monitor 5 and not really sure why. It sounded ok but the spacer version was better. With the smaller baffle of the Mini Monitor I could not get away without this spacer and every attempt resulted in very rough frequency response.
The spacer is not hard to make but requires time and a steady hand. If you need to fix a set but don't want to tackle the spacer, drop me an email and I can build a set for $10 plus shipping. If you send me your stock faceplates I can remove the lens and bond the spacer to them. When you get them back the replacement tweeter is ready to bolt on without fuss. I'll even include the longer bolts needed.
When designing the crossover to work with the new tweeter I had 2 goals. Make it sound great and keep as many of the stock crossover pieces as possible to reduce cost. These speakers are fairly inexpensive on the used market so its a toss up to fix or replace. I hate to garbage something like this when a relatively small amount of money will repair them for good.
Since the initial posting of this guide some more tweaking was done and I have altered the crossover for the final time.
You will need 2 of everything:
- Scan-Speak Discovery H2606/9200 or D2606/9200
- Plastic spacer for tweeter
- 3x12mm cap screws. Need 3 per tweeter. Hobby shop should have these by either Du-bro or Traxxas
Crossover
- 3.9uf poly cap - cheapest option
- .22mh 20ga air core inductor - cheapest option
- 4 ohm 7watt or greater resister - cheapest option (solen only has 3.9ohm)
- 0.39uf 250v or greater poly or mylar cap - cheapest option (optional)
- 2.2uf poly cap - cheapest option
The wrench in the plan is somewhere in production Paradigm changed out the PCB on this speaker. I think the circuit topology is the same but a couple values were tweaked. Mine is the shorter PCB and I think the older version but can't be certain. Going off an internet picture the newer version has a heavier guage inductor in the tweeter circuit and a slightly larger value resister of 2.3ohm. If you have the newer version you will have to trace the circuit to ensure the topology matches. Here are some pics to show the differences.
Tweeter
This is where I describe mounting the new tweeter to the Paradigm faceplate and show why the tweeter lens needs to be trimmed of. Also a quick note on where to notch the cabinet. All identical to the Monitor 5.
Crossover Design
To start off I needed a baseline from the original design. The measurements were taken indoors at 1m and the data is useless below 300hz due to the nature of gated measurements.
New Crossover
So I missed the mark on one of my goals and was not able to salvage any components from the stock high pass circuit. Fortunately the new parts have small values and therefore smaller costs. In the end the extra couple bucks was worth it. They are very neutral sounding and extremely enjoyable to listen to. If the stock Mini Monitors were just a touch forward sounding in your space or you have a smallish room you will like how they turned out. If you find them just a little bright still the 4ohm resister can be replaced with a 4.7ohm, this will reduce output by .5db from 4000hz and up.
Couple notes on the modifications to the low pass section. First off the .39uf is optional. It creates a notch filter around the 7k mark, the result of that is it reduces the output in the midrange by about 1db. If you found the stock sound a bit forward then you will want to at least try it with this cap in place. This cap is very sensitive to even small changes. Definately do not go any larger in value but you can reduce to .33uf if you have some mylar caps on hand and save some money. The 2.2uf cap is not optional and it should be something other than electrolytic.
- Crossover schematic
- Simulated response at 1m
- Simulated response at 1m compared to actual stock response (stock is the reference curve)
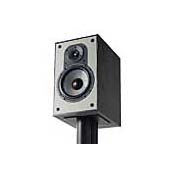
- Actual measured response
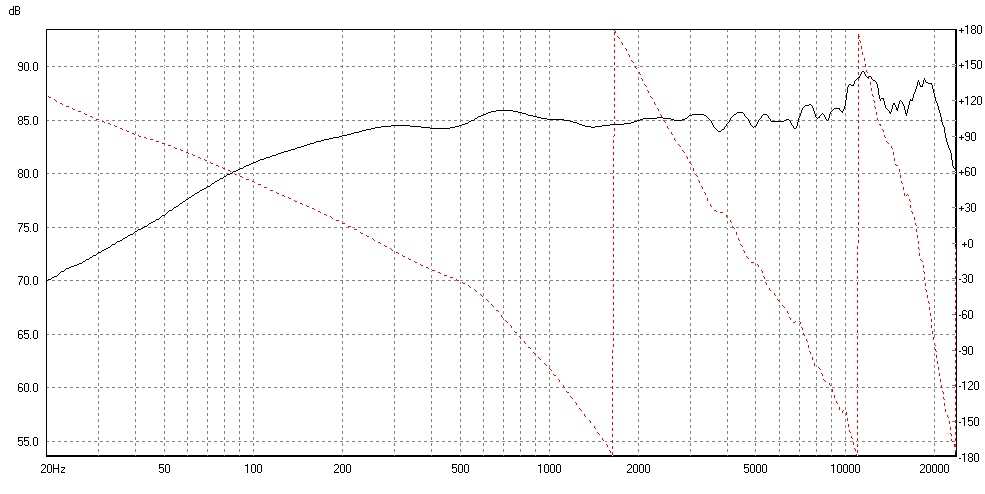
- Actual measured response reverse tweeter polarity
- PCB top detail
- PCB top complete
- PCB bottom detail
- PCB bottom complete
Update Jan 2022
I received some comments back that my crossover sounds good but it has a high component count and is rather complex. I keep forgeting most folks do not have a tub full of spare crossover components to draw from. To make things simpler but keep the sound good here is a revised version. Best part is the low-pass section is completly stock! Note the simulated response is at 2m which would be a typical listening distance.
lord_darkhelmet at accesscomm dot ca